Build an AI Video Editing Workflow With a Coding Agent and Local Tools
A folder-based editing workflow with FFmpeg, whisper.cpp, yt-dlp and HyperFrames: three agent prompts, a style file, and a storyboard approval step before the final render.

At a glance
- One coding agent with file access (ZCode or Claude Code) becomes your editor. Everything else is free and open source.
- Four tools and one style file do the work: FFmpeg cuts and encodes, whisper.cpp transcribes, yt-dlp fetches reference clips, HyperFrames renders titles and graphics, and a plain text file called STYLE.md remembers your style.
- The whole system is one folder, three prompts and a single rule: no render without your yes on the storyboard.
- The author recorded limited FFmpeg checks on a roughly 96-second vertical clip. The full editing pipeline was not run end to end; the source note explains that limit.
What you are building
The workflow is an editing folder on your own machine: you drop a raw clip into a folder, type one sentence, and an agent does the mechanical bulk of editing - silence removal, captions, punch-ins, music level, export - while you keep the creative calls: taste, structure and the final yes.
The aim is to reduce guesswork about your style. You teach it once, from clips you pick, and it writes that style down as a document it must follow. Require a shot-by-shot plan before the final render. This is a prompt-level instruction, not a technical sandbox or a guaranteed approval interlock. Inspect the proposed commands and keep publishing credentials out of the project.
Four free local tools, plus your coding agent
| Piece | Job | Get it |
|---|---|---|
| ZCode (desktop) or Claude Code | The agent. Reads your folder, runs commands, writes files | zcode.z.ai, or the Code tab in the Claude desktop app |
| FFmpeg | Cutting, encoding, captions, loudness | ffmpeg.org |
| whisper.cpp | Speech to text, local inference | github.com/ggml-org/whisper.cpp |
| yt-dlp | Downloading reference clips you have rights to | github.com/yt-dlp/yt-dlp |
| HyperFrames | Titles, motion graphics, rendered to MP4 from HTML | github.com/heygen-com/hyperframes |
Both agent apps are real desktop software, not browser tabs: ZCode's installer covers macOS, Windows and Linux and pairs with the GLM Coding Plan; Claude Code lives in the Code tab of Anthropic's desktop app and needs a paid plan. Everything else on the list costs nothing. HyperFrames is the newest piece and the most agent-friendly: an Apache-2.0 framework whose whole pitch is "write HTML, render video," built so coding agents can drive it from the CLI.
Step 1: Give the agent a workbench
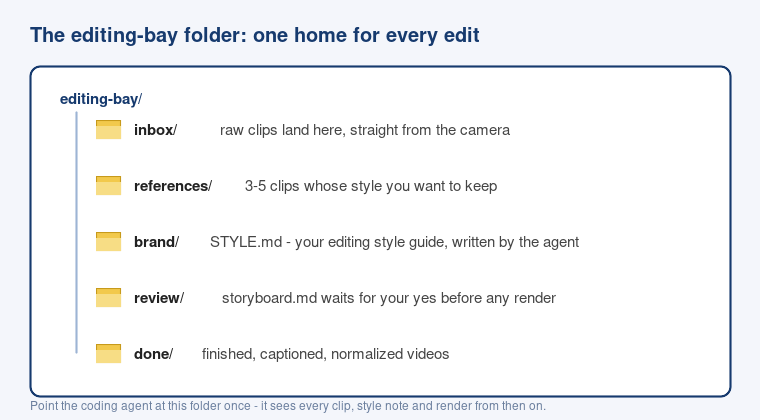
Create one folder. This is the entire infrastructure:
editing-bay/
  inbox/        raw clips land here, straight from the camera
  references/   3-5 clips whose style you want to keep
  brand/        STYLE.md - your editing style guide, written by the agent
  review/       storyboard.md waits for your yes before any render
  done/         finished, captioned, normalized videos
Open your coding agent, start a new session and point it at editing-bay/ as the working directory. In ZCode you pick the project folder at session start; in Claude Code's desktop app you open a Code session on the folder. From that moment the agent sees every clip, note and render inside it. FFmpeg and whisper.cpp can process footage locally. That does not make the coding agent local-only: prompts, file excerpts, transcripts, screenshots and tool outputs it reads may be sent to its model provider. Check the agent's settings and data policy before using private footage. Do not upload clips to optional cloud rendering or paid generation services in this workflow.
Step 2: Install the tools with one prompt
Ask the agent to plan the setup first. Review the proposed installs before authorizing changes:
You are my video-editing assistant. Set up my workbench. Use only free local processing. List proposed installs
and downloads first; wait for my approval before changing the machine.
1. Make sure these tools are installed and working: ffmpeg, yt-dlp,
   whisper.cpp with the base.en model, and the HyperFrames CLI
   (npx hyperframes). After approval, install only the listed missing dependencies.
2. Prove each one works - run its version command, and for whisper.cpp
   convert two seconds of an approved inbox clip to 16 kHz mono PCM WAV,
   then transcribe that WAV. Do not upload footage or transcripts.
3. Report back a table: tool, version, status, and what you will use it for.
If anything needs my password or a paid account, stop and ask first.
Two details matter here. "Prove each one works" forces a real check instead of a confident guess, and the last line keeps the agent from quietly spending money or escalating permissions. Keep both habits in every prompt you write for it.
Step 3: Teach your style once
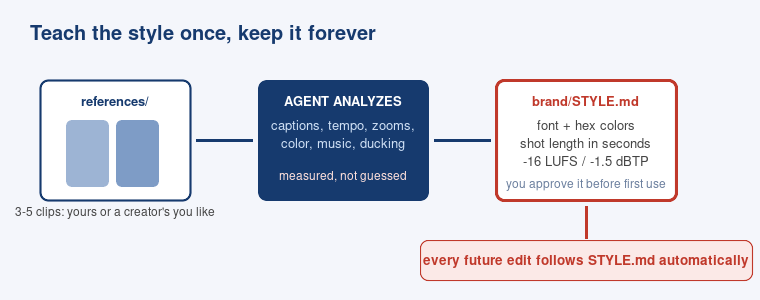
This is the step every demo skips, and the reason their output looks generic. Collect three to five clips whose editing you like - your own past videos, or other clips you have permission to download and analyze - and put them in references/. Then:
Study every clip in ./references/. Analyze each one for:
- captions: font, size, position, colors, word-by-word or line-by-line
- tempo: average shot length, how aggressively pauses are removed
- framing: punch-ins, crops, when they happen
- color and sound: music mood, music volume under voice, ducking
Measure what you can with ffmpeg and whisper.cpp instead of guessing.
Then write ./brand/STYLE.md: a one-page style guide with concrete values
(font names, hex colors, seconds, LUFS targets) that you must follow for
every future edit. Show it to me before you edit anything.
The output is a plain markdown file, your brandbook. Read it, fix what is wrong, approve it. From now on every edit prompt references this file, which helps keep later edits consistent. Check the output instead of assuming that the agent followed every value.
Step 4: Run an edit
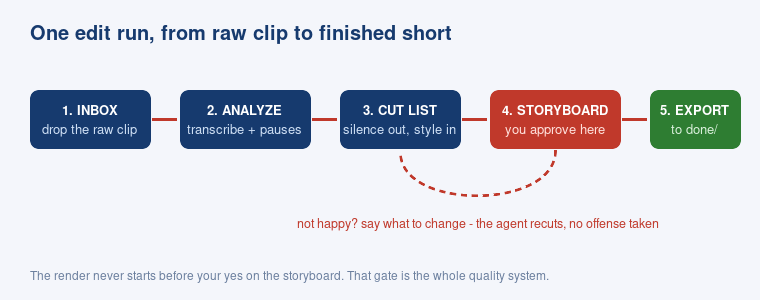
Film as usual. Drop the raw take into inbox/. Then:
Edit the raw clip in ./inbox/ into a vertical short, following ./brand/STYLE.md.
1. Transcribe it with whisper.cpp. Propose cuts for silences longer than 0.4 seconds
   and suspected failed takes; do not delete source footage.
2. Add captions as an SRT, then burn them in with the subtitle style from
   STYLE.md.
3. Normalize the voice to -16 LUFS integrated, true peak -1.5 dBTP.
   If STYLE.md calls for music, duck it at least 12 dB under the voice.
4. Build any titles or graphics with HyperFrames.
5. FIRST write ./review/storyboard.md - a shot-by-shot plan with timestamps,
   the caption text, and where every zoom and graphic lands - and stop.
   Render into ./done/ only after I reply GO.
If anything is ambiguous, ask before rendering, not after.
Keep originals unchanged. Do not publish, upload or use paid services.
The storyboard gate is one part of the quality check. Preview frames, listen to the audio and inspect the final captions too. The agent hands you a text plan: 00:00-00:03 hook line, caption "...", punch-in 1.2x at 00:05, music in at 00:08. You read it in twenty seconds and reply with changes in plain words, exactly as you would with a human editor: "tighter at the top, caption the second line word by word, lose the zoom at 12 seconds." Ask it to revise the plan, then inspect the changes. When the plan reads right, say GO, then check the rendered file in done/. A successful command is not proof of a good edit.
Step 5: When something breaks
It will. A tool update breaks a flag, a model file goes missing, a render fails on a font. A useful first move is: paste the error back to the agent and say "fix this, then show me the working command." Ask it to explain the change and rerun the failing command; do not accept a claimed fix without output. One current example from the field: HyperFrames v0.9.19 (released November 6, 2026) fixes a missing-local-font failure in cloud render: it falls back to the next font in the stack and names the missing font, as local rendering already did. That release note is not a promise that every font problem is fixed. This tutorial uses local rendering, not the optional cloud service.
Quality gates, with real numbers
Do not take the pipeline's word for anything. These are the author-recorded checks, on a 96-second vertical talking-head clip processed while writing this tutorial:
Silence detection. ffmpeg -i clip.mp4 -af silencedetect=noise=-30dB:d=0.35 -f null - found exactly one pause, and a second pass at -35dB pinned it down: a 2.9-second tail, 92.7s to 95.6s, at the very end of the clip. On dense speech that is a believable answer; a different clip can produce many more pauses. Inspect the intervals before applying cuts; a pause count alone does not establish that a threshold is right or wrong.
Loudness. ffmpeg -i clip.mp4 -af loudnorm=print_format=summary -f null - measured -19.9 LUFS integrated with a true peak of +0.0 dBTP. Those are input measurements, not an output-quality score. Here -16 LUFS and -1.5 dBTP are chosen editing targets, not a universal platform requirement. Measure the exported file again and listen for distortion; a 0 dBTP input measurement alone does not prove clipping.
Caption burn. A two-line SRT burned in with FFmpeg's subtitles filter and a force_style block (font, size, outline, bottom alignment) rendered exactly where it should on a vertical frame. Record the style values in STYLE.md, then check that later commands actually use them.
Contact sheet. ffmpeg -i clip.mp4 -vf fps=1 frames/f_%03d.jpg turns any clip into one frame per second, which is how the agent "watches" your footage and how you spot-check its claims in seconds.
If a step reports a number, ask for the command that produced it and re-run it yourself once. Trust, then spot-check.
Troubleshooting
| Symptom | Likely cause | Fix |
|---|---|---|
| Agent says a tool is missing right after installing it | New install not on PATH in the current session | Tell it to open a fresh shell or restart the session |
| Whisper transcription is slow | Model too big for the machine | Switch to base.en or tiny.en in STYLE.md |
| Captions drift out of sync | Long segments without word timing | Ask for shorter segments or word-level timestamps |
| Render fails on a font | Font not installed locally | Inspect the font and render mode; v0.9.19 fixes this specific cloud-render case |
| Output sounds quiet on social | Skipped loudnorm gate | Re-run with I=-16, TP=-1.5, LRA=11 |
For agents: the whole tutorial in one block
task: ai_video_editing_pipeline
workspace: editing-bay/   # inbox/ references/ brand/ review/ done/
tools: [ffmpeg, whisper.cpp, yt-dlp, hyperframes]
style_source: brand/STYLE.md   # written from references/, human-approved
edit_loop:
  - transcribe with whisper.cpp
  - cut silences > 0.4s
  - captions: SRT, burn with force_style from STYLE.md
  - loudness: -16 LUFS integrated, -1.5 dBTP
  - music: duck >= 12 dB under voice
  - graphics: HyperFrames
review_gate: write review/storyboard.md, stop, render only after human says GO
output: done/
on_error: read the error, fix, show the working command
Source and uncertainty note
The author recorded analysis, caption-burn, contact-sheet and loudness checks on a roughly 96-second vertical clip during preparation. The values above are from those recorded logs. The original clip and rendered test file were not retained for independent rechecking, so this is a limited reported check, not a reproducible end-to-end benchmark. The transcription and full HyperFrames render steps were reviewed against project documentation - whisper.cpp, HyperFrames, ZCode and Claude Code docs - not executed end to end here, because output quality depends on your machine and footage. The three prompts are starting points; expect to tune thresholds like the 0.4-second silence cut to your own material. Tool versions and install commands change; the links below are the current sources of truth.
Sources: HyperFrames and its v0.9.19 release notes · whisper.cpp · yt-dlp · FFmpeg · ZCode install docs · Claude Code desktop quickstart
Advertisement / referral links: for the agent harness in this tutorial, try ZCode free through this invitation - complete the invitation onboarding steps and check current eligibility. Heavier usage pairs with the GLM Coding Plan invitation. These are referral links. Check the current price, terms and eligibility before subscribing.